January 17, 2017
Bas Relief Tile Texture Project
Bas Relief Textured Tile Project!
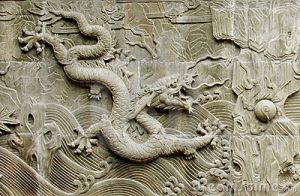
Cultures all around the world make BAS RELIEF meaning LOW RELIEF! This is 3-D art rising from a flat surface. A penny is an example of bas relief because part of the surface is raised!

Here is a cool dragon in the bas relief style.
We are going to recreate ancient bas relief tiles to learn about texture and practice making it!
There is an accompanying video to this lesson here.
1. Roll slab of clay
2. Lay cardboard template on top and cut around it with pin tool.
3. Smooth your tile with your finger, a toothbrush, water
4. Cut out the ancient tile design you chose with scissors
5. Lay design on top of clay slab
6. Go over every line in the design with a pen
7. Lift paper/ Faint lines should appear in the clay where you traced!
Now is the time to add texture!
1. Incising – cutting the clay
a. Go over all lines with pin tool to make them more pronounced
b. Use small loop tools to cut wider lines or certain shapes out
2. Applique – Adding clay
a. Add clay to emphasize certain features!
b. Whenever you add clay, SCORE (make lots of scratches) the clay you are adding and where you are adding the clay, use water as well! Smooth
3. Stamping – press stamps into the clay
a. Create a pattern in the background with stamps! Mine is all random but you could make it even as well!
Next Class Period – hopefully your clay has firmed up some and is now leather hard!
If you have finished the 3 forms of texture on your piece now is the time to refine!
1. Brush off top with large dry brush (like an archeologist)
2. Smooth rough areas with a wet brush
3. Use a pin tool or loop tool to clean out rough or boogery areas
4. Gently flip it over. Smooth the backside with fingers, water, a toothbrush
5. Carve an inscription on the bottom, at the least you initials, at the most to so and so from so and so 2017…
At this point you can decide if you want your tile to be a trivet or a wall hanging!
Trivet – roll 4 small balls of clay of even size. Score and attach them to the 4 corners to act as little legs. Smooth.
Wall hanging – bore holes in each of the top corners. Twist as you push the bring tool through. Clean up holes.
When you are done and it is the best that it can be